Major DIY-age

March 31st, 2008

The long bank holiday weekend over Easter is traditionally time to begin big DIY projects (and then leave them part-finished for most of the next year!) and I decided that it would be an ideal opportunity to do all the electrical work that I’ve been planning since virtually the day I bought the boat.

batteries
The new battery tray, with two new domestic batteries and the engine battery

So, what’s been done? Well, I fitted the four new batteries I bought back in November, replacing the one old and knackered one that’s been on its last legs since I bought the boat. They’re all connected together with heavy-gauge cable, and the plan was to connect them up to a Victron Phoenix MultiPlus combination inverter/battery charger. The Phoenix unit duly arrived (although I ended up buying it from a more expensive supplier as my first choice cheaper supplier mucked me about) but once it was mounted on the kitchen wall it became clear that I had a problem.
The manual recommends very heavy 70mm2 cable to connect this unit to the batteries. The cable I had ordered in from Barden UK, and because the manual didn’t specify any kind of connector, I went for bare ends on the cables to the inverter. Opening up the unit, however, reveals that the cables should have a crimped terminal fitted to them. Unfortunately, once these terminals are fitted to the cable, the terminal is too big to go through the strain relief gland on the bottom of the inverter. I’ve now worked out that I can take the glands off the bottom of the Phoenix, thread them on to the cables and then take the cables down to my local electrician’s supplier who have agreed to crimp the terminals on for me – you need a special hydraulic crimping tool, as the terminals are massive! Unfortunately their tool is out on hire, so I’m hoping for a call at some point this week and then I can finish that job. Once fitted, the Phoenix will give me mains power from the batteries and also act in reverse to charge the batteries when the generator is switched off.

Inverter wiring
The Victron inverter and chaotic wiring on the kitchen wall

Other jobs involved assembling the new office desk and filing unit in the office area, and wiring 12v and 240v power through to the desk. I’m now sat at the desk with my PC, which is marvellous! I still need to sort out the floor, though, which is messy – some old ceramic tiles need to be lifted and I need to lay some consistent flooring over the whole office area.

office desk
The office desk

LED spotlight
LED spotlight for the office – very bright blue-white light – came from Screwfix!

boats in the snow
Dreaming of a white Easter – it got worse than this, about 4cm fell in total!


Tidy cabin and improvement plans

March 12th, 2008

Not the most exciting post this one, but…

Last weekend I took the boat to Cambridge to “do the tanks” (fill the fresh water tank and empty the foul) and so I offered some friends from church a ride on the boat on the return journey on the Sunday. So, faced with having guests, I cleaned and tidied, which was long overdue. I also bought more storage boxes – some to improve the storage efficiency under the bed, and two recycling boxes from Homebase to store kindling and coal for the stove. Previously I’ve just put the coal bag on the cabin floor, which leaves coal dust all over everything it touches…

recycling boxes
Recycling boxes adapted as wood and coal bins

I also discovered that by tidying up and removing the nasty folding chairs that came with the boat (which I only ever use to dump stuff on anyway), I create enough space for me to get six of us around the dinner table, and after folding the table back to the dinner-for-one size, the cabin looks positively spacious!

I took some pictures to prove that the boat is occasionally tidy!

cabin
Tidy cabin, looking forward

cabin
Tidy cabin, looking aft

My improvement plans are moving forward. I’ve ordered a corner desk and filing unit from Mrs Flatpack and hope it’ll be delivered before too long. I’ve got the long weekend at Easter planned for the Big Electrical Upgrade (new batteries, new split charge, new inverter/battery charger) and so I’m about to place a very large order for all the parts so that I can check them all whilst I have time to order anything I’ve forgotten.

Oh, and whilst it’s been incredibly windy (50mph+ gusts), the boat’s been fine so far. Martin’s new concreted bollards are much more effective at holding the boat in position than the mooring pins were!

cabin
One of those awkward self-portraits done with a self-timer…


Extraction and destruction

February 24th, 2008

I’ve had a weekend of DIY – it started on Friday night when I discovered that the Big Maplin on Newmarket Road was open until 8pm (gosh, I have an exciting life, don’t I!) and so I bought the bits and pieces for a job I’ve been meaning to do for a while – putting extractor fans in the bathroom and kitchen. I did the kitchen fan on Friday night, and in the process discovered that most of the wiring for the kitchen lights is just held together with insulating tape…

On Saturday I had a tidy-up and a clear-out of unwanted junk, and then did a recce for some wiring work I want to do fairly soon. In the process, I found myself looking at the woodwork in the dinette area, which I’m planning to rebuild into an office and wardrobe area. I ended up ripping out all the unwanted timber, which turned out to be slightly non-trivial. Anyway, it’s done now.

Today I’ve done the wiring for the bathroom extractor, which I’m hoping will reduce the amount of damp and condensation in there.


Honda EU10i generator repair hints

February 16th, 2008

On Tuesday night, at around 10 at night, the generator, which had been running happily for three hours or so, suddenly stopped dead. I went out to investigate, and found that it still had fuel in the tank and wouldn’t restart. I cursed it mildly and packed it away for the night. It was dripping wet from the thick fog we were having, and it occurred to me that the last time it had died it had done so after Cambridge had experienced torrential rain.

Some preliminary investigations revealed that the oil warning light came on as you pulled the starter, which had also happened the first time. As the guys at Elliotts (who’d repaired it last time) had said there was water in the fuel that time, I thought I’d investigate this first. In the back of the owners’ manual it explains how to drain the carburettor, which seemed like a good thing to try. Water is heavier than petrol, so it sinks to the bottom of the tank, where it goes down the fuel line and into the carburettor. To drain the carb, open the side maintenance panel (the one surrounding choke lever) and pull out the three lengths of clear plastic tubing that are tucked into the casing – they’re not attached to anything at the bottom. Put them into a container of some sort (I used a large jam jar) that you can use to catch the water/petrol when it drains. Make sure that the engine switch (which is also a fuel valve) is turned ON and then undo the screw on the bottom of the carburettor by a few turns, and the fuel should start to flow. About 200ml of fuel should drain out, and you should be able to tell if what you have is water or petrol.
Mine was definitely petrol and not water!
If you disconnect the HT lead from the spark plug and pull the starting handle, you will pump fresh fuel from the tank through into the carb – you can empty the whole tank this way if you have enough patience.

drain screw
Position of the carburettor drain screw

Of course, this didn’t solve my problem, which left me thinking that the problem was electrical – some damp mucking with the electrics and preventing the engine from firing. So, last night, seeing as it was clear and breezy, I left the cover off the genny to help it dry out.
This morning, when pulled over, it spluttered briefly into life and then died. Further fiddling made it start about one time in twenty. At this point, encouraged that the thing wasn’t entirely dead, and with assistance from my landlord Martin and his daughter Sabrina, I took the whole thing apart for further investigation.
This is slightly fiddly, but easy when you know how. Now that I do know how, I’m sharing that knowledge, as there seems virtually nothing on the internet about how to fix these generators, which gives an idea as to how reliable they are!

Anyway, first drain the fuel tank – this isn’t totally essential but is recommended on safety grounds. Next, remove the side maintenance cover and unscrew the grey plastic end covers (one around the sockets, one around the exhaust) – they both undo with four screws each and then pull off. To take the rest of the casing off, first peel back the rubber surround around the fuel cap on the side nearest the sockets – you’ll find a small brass circlip which you need to prize off. This is a bit of a fiddle, and even more so to get back on again unless you have circlip pliers.

circlip
The circlip under the fuel filler surround

Now undo the screws on either side of the socket panel – there’s one on each side. They’re not captive, so remove them completely from the cover rather than dropping them on the ground when you tip the unit on its side! Roll the unit onto its side, with the starting handle downwards, and undo the screws in the handle and the base. You’ll need a Philips No 3 screwdriver (PH3) and if your unit is like mine, the screws will be very tight indeed. You should now be able to lift off the plastic cover and get at the insides in an ordered fashion. Alternatively (as I did), split the cover in half whilst the machine is upright, and watch everything spill all over the floor!

generator in bits
Anatomy of an EU10i – from back: engine/alternator block, fuel tank, inverter, socket panel

I was looking for the ignition system wiring, which is buried at the bottom of the casing underneath the engine and the inverter unit. This turns out to be a bit below Honda’s usual high standards – the ignition wiring has lots of connectors (some multipole and some bullet crimps) and none of them are very well waterproofed. What eventually solved my problem was getting at the engine switch, which is actually a small black microswitch just below the edge of the maintenance panel. It’s pressed in by the white plastic rod that’s turned by the engine switch knob itself. It’s a proper pain to get at, as you have to unscrew it from the cover from the inside, which involves moving everything else out of the way. Anyway, having unscrewed it, I was able to trace its cable back to a two-pole connector covered in muck and sludge, which I disconnected. Having done this and cleaned the connector, I pulled the starter carefully, and the engine sprang into life. Of course, it wouldn’t stop, as I’d disconnected the ignition switch (oddly, the switch closes to stop the engine) and so we had to stop it by pulling the HT lead off the spark plug.
I decided at this point to clean the water/oil/petrol/WD40/grime out of the casing and electrics, and to waterproof the ignition system connectors with self-amalgamating tape. Thanks to Helen for buying me some whilst she was in Cambridge!

switch
The engine microswitch

Reassembling the generator was a bit fiddly, too. Firstly, reassemble the engine mountings – the rubber disks and metal shafts – there are two in the bottom and one in the handle.

half-assembled generator
The generator with one side removed. Note the three round engine mountings

The inverter unit (the slim aluminium unit) and the fuel tank have to fit together quite tightly, and there’s a rubber spacer that holds them in the right position:

inverter and fuel tank
The inverter (top) and fuel tank (bottom) with the rubber spacer between them
Reassembling the case is fairly easy as long as you have the inverter and fuel tank located correctly in their mountings. You may need a second pair of hands (thanks Sabrina!) to hold the casing together whilst you get the circlip back on.

Anyway, I now have a working generator, and am going to take more detailed steps to stop it getting wet in future – but I hope my experience will help anyone else who suffers similar problems.


Generator woes

January 28th, 2008

I went to Dublin a couple of weeks ago with work, to be enthusiastic about BAS to Irish schoolchildren at a big exhibition, and whilst I was away it rained a lot in Cambridge. Upon my return, I pulled the starting handle on my ever-faithful Honda generator and it wouldn’t start. Oh dear. One of the features of Honda engines is that they are extremely reliable, and the little EU10i generator has performed brilliantly for as long as I’ve owned it. It nearly always starts on one pull and is quite happy to look after itself – the nifty electronic engine management stops it automatically if it overheats, runs out of oil, etc, etc, and so it’s virtually foolproof. I put two and two together and reckoned that the wet weather was possibly to blame. The generator does normally live on deck (it’s unwise to keep petrol in a closed cabin near to sources of ignition, and against the Boat Safety Regulations) and it did once have a rather nice Honda waterproof cover until it blew away in some very high winds a month or two ago.

I brought the generator inside to try and dry it off, but still nothing. So I eventually took it down to the Honda agents, Elliotts, in Bar Hill, just outside Cambridge, where they serviced it and solved the problem, which turned out to be water in the fuel tank and carburettor. This cost me £60, but they did do a service (oil and filter change, new spark plug) at the same time, which I’d been meaning to do anyway. To avoid further expense in future, I shall be keeping a strong plastic bag strapped over it whilst it’s living outside!

The fact that the internet contains virtually no information about possible faults with an EU10i shows how reliable they are – so I’m blogging this in the hope that anyone else who has a wet generator that won’t start knows to either take the machine to be fixed or cleans and dries the carburettor and fuel tank themselves!


Adrift

January 7th, 2008

This morning it was very windy. According to the Met Office, the wind was 30mph with 50mph gusts, which made for an entertaining bike ride into work!

Just as I was getting a coffee, I got a phonecall from my neighbour Helen, to say that Innocenti was in danger of coming adrift, but that they were getting things under control. What had happened was that the force of the wind (which was coming across the fen and hitting the boat broadside on) had ripped out the two mooring stakes and the boat was only being held to the bank by the stern rope, which was tied around a solid metal post set in concrete. When Helen, Gabriel and Phil started to rescue the boat, this post and concrete block were being dragged away from the bank by the combined force of the wind and current.

I got a text later on saying it was secure, but reckoning that they’d lost the gangplank. This was a pain, as I’d actually borrowed the gangplank from Phil (he’s got a spare one) after the last one vanished downriver when the boat last came adrift. I decided to shorten my afternoon at work and go and check on things – when I got back to Waterbeach I found all the boats tied up very securely and I put a couple of extra mooring lines on Innocenti just to make sure. Phil, meanwhile, had found the gangplank on the other side of the river (it floats, being wooden) and retrieved it, so I was saved the cost of a new one for him! I’ve subsequently bought a long piece of wood to make a new one, but it’ll have to be painted before I can leave it outside. Another job to add to the queue…


In-boat entertainment

January 6th, 2008

Once again I begin by apologising for not writing earlier – just when I’d settled back into life on the boat I became embroiled in the whirlwind of Christmas and have only just extricated myself again… happy New Year everyone! It’s odd to think that I was still at Fossil Bluff this time last year – 2007 was a pretty excellent year for me, so let’s hope 2008 is as good or better.

Anyway, a slightly geeky post this one, but perhaps one of interest to my fellow boaters. I’ve just this evening finished wiring my new stereo system in the cabin, which includes the rather nice new loudspeakers that Mum and Dad kindly gave me for Christmas. I’ve also been meaning to describe the work I did installing a DAB radio in the kitchen back in September, so instead I’ll describe them both here.

Starting with the radio, I quickly realised once I was living alone on the boat that I needed Radio 4 to keep me company. My little FM portable doesn’t work at all inside the boat, of course, so I had to look at getting a radio with an external antenna. The obvious solution is a car radio, of course, but I went and looked at a few and found them to expensive, ugly and with rather poor user interfaces. Anyway, I dawdled around the various electrical megastores in Newmarket Road and came across this Hitachi DAB radio in Currys. It’s a DAB/FM radio, which uses the NXT flat-panel loudspeakers, making the design very slim and light. However, the two clinching factors were that it runs on 12v from an external power supply (meaning that I could easily hook it into the boat’s electrics) and that the telescoping antenna supplied with it can be easily replaced by an external one. A quick trip to Maplin supplied me with a suitable power connector and cable, which got wired into the kitchen lighting circuit, and then I found a suitable DAB antenna kit in the Screwfix catalogue. The antenna is clamped onto the handrails up at the bows, and the feeder cable runs along the handrail and then comes down to the radio through the ventilator in the kitchen ceiling. It works well, although it suffers from the problem of all DAB sets – it uses a lot of power.

For the main cabin I wanted a system to play music from my little MP3 player, and found the intriguing Sonic Impact T-Amp whilst Googling for 12v amplifiers. The T-Amp is tiny, not much bigger than a paperback book, and all that’s in it is a little one-chip amplifier and a volume control. It uses a clever PWM-based circuit that lead some people to call it a “digital amplifier”, which it isn’t, it’s more like a switch-mode power supply. Anyway, some reviews on the internet suggested that various people in the audiophile community reckon that this is The Best Thing Since Sliced Bread, and at about £30 it seemed like a good buy. Then I actually tried to buy one. The things seemed to be in very short supply, so I ended up ordering one from Think Geek in the US because it was about the same price including shipping as the only UK stockist, and Think Geek had one in stock. I’m glad I did because the manufacturers have subsequently discontinued the basic model and replaced it with a more expensive second-generation model, which is basically the same circuit in a fancier case. Anyway, it’s sat around in its box waiting for a pair of loudspeakers since November. Today I’ve hooked it up to the pair of JBL Control One speakers that I got for Christmas (thanks again, Mum and Dad!) and also managed to wire it into the boat’s 12v supply. This was only slightly trickier than it sounds. One of the reviews I read said that the amp runs from a nominal 12V but won’t tolerate any more than 14V. Unfortunately, the boat’s alternator regulator routinely kicks out 14.5V with the engine running (this improves the battery charging performance), so I needed a regulator to protect the amp. Fortunately I found one in Maplin today – it’s a little compact multi-voltage unit which comes with a choice of DC plugs, one of which fits the T-amp – and it delivers the necessary 1.5A to the amplifier quite happily. I wired in an extra cigar lighter socket at the forward end of the cabin and plugged it all in – hey presto, music! The system does sound good, although it’s hard to tell given that the source is my tiny MP3 player with its compressed music and the boat cabin’s hardly an ideal listening room. Anyway, I now have to decide how best to mount the loudspeakers, as they’re currently just floating around the floor until I give them a proper home.


The water works!

November 28th, 2007

Just a quick update – this morning I’ve filled the water tank and after a little faffing to remove an airlock in the pump inlet hose, we now have water in the taps at a sensible rate of flow. And the hot water system now works properly and doesn’t give up when you try and mix hot and cold water. Now all I have to do is get some heavy-duty silicone sealant to stick the access hatch back down on the water tank so that it doesn’t get leaves and dirt blown into it.


Black bottoms and hot water

November 27th, 2007

This is the long saga of Innocenti’s recent trip to Earith for some maintenance work. When I bought the boat, the hull was quite shabby and the paint was scraped off in many places, and so I knew that it would have to be repainted fairly soon. This is quite a big job – the boat has to be craned out of the water – and so it’s also an ideal time to do other maintenance jobs that are best done by a boatyard. Anyway, on the advice of several of my boaty friends and neighbours, I booked in at Westview Marina in Earith, and took the boat down there two weeks ago. Earith is quite a long way from Waterbeach – about six hours cruising time – and with the short winter days it would be tricky to do in one go. On the outward journey I stayed overnight at Stretham.

The straightforward work was done pretty quickly. Innocenti was craned out of the water and then pressure-washed off before the old paint was removed with scrapers and then sanded down to give a good base.
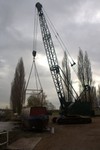
crane
The crane at Earith

hull waiting for paint
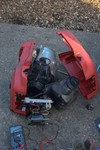
Scraped down and ready for paint

It was also clear that the anodes needed replacing, so the old ones were cut off and four new ones welded on. Anodes are lumps of magnesium which act as “sacrificial protection” for the boat’s hull – because magnesium is more reactive than iron, it corrodes away first, ensuring that the hull has a longer life.

old anodes
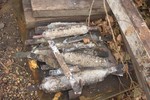
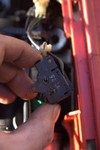
A heap of old anodes awaiting disposal

new anode and propellor
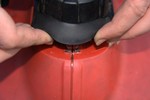
One of Innocenti’s new anodes

Another much-needed job was to clean out the freshwater tank. This is under the foredeck, and is integral to the hull. Every few years it should be cleaned out and the inside repainted. Judging from what Graham and his team found inside – lots of rusty sludge – this hadn’t been done for quite some time! Whilst cleaning out the tank (a horrible job in a confined space) was fairly straightforward, getting the paint to go on and dry in the cold and damp November weather proved to be virtually impossible. Graham wasn’t satisfied with the result, and said he wouldn’t try to do one again in wintertime – so the boat will have to go back in the summer for the job to be finished off properly.

Anyway, with this unforseen problem, the boat was in the yard for a week longer than planned. I made arrangements to go and collect it this weekend – and as it happened, I’d arranged for several friends to come and see me that weekend, so we planned a day out on the river to bring the boat back to Cambridge.

Things began to go wrong at this point. I got a cold during the week, and had two-and-a-half days off work being snivelly and wretched. By the Friday afternoon, when Chris came to pick me up (I’d been staying with Rob, who very kindly allowed me to occupy his spare room for two weeks) I was feeling better but still snorting and sneezing. We got to the marina and found out that with the paint still only tacky dry on the water tank, we were going to have to live off bottled water for the next 24 hours or so until the paint dried and we could fill the tank. Then the tank would have to stand for four hours (to soak off any nasty compounds from the paint used) and drained, before being refilled with fresh water.

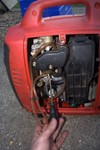
At this point we went to Huntingdon to pick up Dave from the station, and elected to have dinner in an Indian restaurant rather than eat on the boat with no water. We spent an uneventful night on the boat, and then on Saturday morning Chris went to pick up Gemma, who’d driven up from London that morning and who was leaving her car in Waterbeach so that we could use it to collect Chris’s car from Earith later in the day. I went to pay the boatyard bill, got the boat going and filled up with diesel. At this point we discovered (having not actually checked, stupidly) that the Great Ouse (which is large and fearsome at Earith) was in full flood. Manoeuvring away from the diesel pump was quite exciting, but we set off down the river the half-mile or so to Hermitage Lock, where we could escape the flood of the Great Ouse and go down the much quieter and smaller Old West River. As we approached the lock the engine temperature gauge shot up. This is never a good thing! As the engine kept plugging on, we stopped at the landing stage, woke up Keith the lockkeeper (who hadn’t had a boat through for three days with the river in this state) and locked down into the much safer Old West River. At this point we stopped on the lock-mooring and looked at the engine. One of the rubber parts of the cooling system had split, and steam was escaping somewhat vigorously. This put an end to our get-home-in-one-day plan – even though I (fortuitously) had a spare part, by the time the engine had cooled and I’d fitted it it would have been too late to get to Waterbeach before dusk. So we drank tea, ate Jaffa Cakes and decided to go to Ely for a pub lunch (steak-and-kidney pie, mmm!) and a look around the Cathedral, which is pretty stunning.

Chris dropped me back at the boat later in the day, and everyone went their separate ways.

On Sunday morning I got up early and changed the part in the engine. This turned out to be quite straightforward, although to refill the engine needed pretty much all my bottled water, so it was fortunate that the ever-helpful Keith was able to refill them from his kitchen tap. I fired up the engine and headed off. An hour or so downriver, the temperature gauge shot up again. This didn’t look good. I managed (eventually) to get the boat in close to the bank on a slight bend, and it went aground. This is quite common – the Old West River is shallow at the edges and it’s often difficult to moor, even at some dedicated mooring sites.
Looking into the engine bay, I find that the lubricant I applied to the rubber part to make it go on easily has worked too well – the engine has shaken the part off again, and I retrieve it from the bilgewater. Now what to do? The engine is hot, I’m short of time and short of water. I refit the part again, and attempt to refill the engine using water I’ve heated on the stove (putting cold water into a hot engine can crack the engine block) as I can’t really afford to wait for it to cool down.

Off we go again, only to stop another quarter-mile downstream with an overheating engine again. Now I’m out of water completely, so I fill my rucksack with the empty water bottles and trudge off along the floodbank – the guidebook shows a small marina and a pub less than a mile away. In fact, just around the corner I see another narrowboat moored up – the kind people of “Straight and Narrow” take pity on me and fill my water bottles. They’re going back to Earith, so they say they’ll shout as they pass me on their way back and check I’m all right.

I go back to the boat, wait for the engine to cool down, and top it up again with cold water. It’s now 1530, and with the light fading, I attempt to motor on the short distance to the Twenty Pence Marina, where there’s an overnight mooring and water supply. On approaching Twenty Pence the engine overheats again, and I hastily manoeuvre into the bank, going aground at a rather jaunty angle and manage to secure the boat. A sign says “Overnight Mooring £2” and “Water 50p”, so I trudge over to the owners’ house to pay me fees. Apparently the water pipe to the riverside froze during the hard frosts and split, so there’s no water available, although he does offer to fill my bottles. I trudge back to the boat, cook some dinner and have a long ranty phone call to my parents about the possible problems with the engine…

On Monday morning I go round to the marina owners’ house for water. It’s deserted – they obviously work elsewhere – so I go round to another house nearby and fortunately manage to obtain some water there. I refill the engine again, this time taking note of some advice Dad had found on the internet: it’s very easy to get airlocks in the engine cooling, particularly if you fill it in a hurry. Once you think you’ve got the engine full, start it up in fast idle with the filler cap off, then watch and see what happens to the coolant level. Sure enough, it dropped off after about three or four minutes, and I topped it up again. Once it stabilised I put the cap back on and left the engine in fast idle for ten minutes or so to check it was happy. It was, fortunately, so I poled off the gravel bank I’d gone aground on and headed off home. I arrived back at Waterbeach at around 1400 on Monday afternoon.

Then came the water tank saga. I’d still not been able to fill the freshwater tank, so this morning I motored down to Cambridge and filled it up, then tied up on Jubilee Gardens before heading over to the local branch of HSS to hire a large water pump – thanks to the magic of Streetcar I was able to hire a car in central Cambridge for the hour or so I needed to pick up the pump and bring it back to the boat.
I did try turning on the boat’s water system briefly, and was somewhat crestfallen to discover that the water pressure was even worse than before the tank was cleaned – I’d hoped that cleaning the tank would solve the problem with the low flow rate through the pump.

This evening, having left water in the tank for the whole afternoon, I emptied the tank with the HSS pump and then clambered into the tank to investigate the flow rate problem. This isn’t fun – the tank is only about 35cm deep, and the access hatch is only just big enough for me to get inside. Anyway, I found that the outlet pipe was blocked with a plug of rust, and with much poking and scraping was able to clear it. Tomorrow I shall refill the tank and I very much hope to be operating at full capacity again. Five days on the boat without running water has been rather unpleasant.

It’s all been a bit of a long saga, but it was definitely character-building rather than enjoyable…


Pictures at long last

October 29th, 2007

Here are the pictures from the trip – sorry it took so long!