WordPress updates and OpenID finally working

February 29th, 2008

I’ve upgraded to the latest version of WordPress to solve a problem with the blog being displayed in reverse order, so sorry if I’ve munged your RSS feeds in the last few days. I’ve also finally managed to make OpenID work for comments, so LiveJournal users should at last be able to enter their LJ URI in the “website” field and get approved for comments quickly and easily.


Extraction and destruction

February 24th, 2008

I’ve had a weekend of DIY – it started on Friday night when I discovered that the Big Maplin on Newmarket Road was open until 8pm (gosh, I have an exciting life, don’t I!) and so I bought the bits and pieces for a job I’ve been meaning to do for a while – putting extractor fans in the bathroom and kitchen. I did the kitchen fan on Friday night, and in the process discovered that most of the wiring for the kitchen lights is just held together with insulating tape…

On Saturday I had a tidy-up and a clear-out of unwanted junk, and then did a recce for some wiring work I want to do fairly soon. In the process, I found myself looking at the woodwork in the dinette area, which I’m planning to rebuild into an office and wardrobe area. I ended up ripping out all the unwanted timber, which turned out to be slightly non-trivial. Anyway, it’s done now.

Today I’ve done the wiring for the bathroom extractor, which I’m hoping will reduce the amount of damp and condensation in there.


MathWorks update

February 20th, 2008

I finally have my Matlab package, it arrived yesterday, by DHL from Dublin. I thought the saga was over, but little did I realise what was in store for me this morning. David (the head of Engineering) appeared in my office with a printout of Monday’s blog post about Matlab. It turns out that the post was picked up by someone in MathWorks’ head office in the USA, and went all round their management before being sent to the UK office. They admitted fair comment on their customer service, but objected to my giving away the level of discount they offered us on the product, which should have been confidential. I’d not been told this, but had I been less frustrated and more rational that day I’d have realised that suppliers’ prices are jealously guarded things. Anyway, I’m shortly going to remove the offending figures from that post.

I am now, apparently, quite well-known within MathWorks…


Honda EU10i generator repair hints

February 16th, 2008

On Tuesday night, at around 10 at night, the generator, which had been running happily for three hours or so, suddenly stopped dead. I went out to investigate, and found that it still had fuel in the tank and wouldn’t restart. I cursed it mildly and packed it away for the night. It was dripping wet from the thick fog we were having, and it occurred to me that the last time it had died it had done so after Cambridge had experienced torrential rain.

Some preliminary investigations revealed that the oil warning light came on as you pulled the starter, which had also happened the first time. As the guys at Elliotts (who’d repaired it last time) had said there was water in the fuel that time, I thought I’d investigate this first. In the back of the owners’ manual it explains how to drain the carburettor, which seemed like a good thing to try. Water is heavier than petrol, so it sinks to the bottom of the tank, where it goes down the fuel line and into the carburettor. To drain the carb, open the side maintenance panel (the one surrounding choke lever) and pull out the three lengths of clear plastic tubing that are tucked into the casing – they’re not attached to anything at the bottom. Put them into a container of some sort (I used a large jam jar) that you can use to catch the water/petrol when it drains. Make sure that the engine switch (which is also a fuel valve) is turned ON and then undo the screw on the bottom of the carburettor by a few turns, and the fuel should start to flow. About 200ml of fuel should drain out, and you should be able to tell if what you have is water or petrol.
Mine was definitely petrol and not water!
If you disconnect the HT lead from the spark plug and pull the starting handle, you will pump fresh fuel from the tank through into the carb – you can empty the whole tank this way if you have enough patience.

drain screw
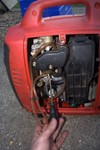
Position of the carburettor drain screw

Of course, this didn’t solve my problem, which left me thinking that the problem was electrical – some damp mucking with the electrics and preventing the engine from firing. So, last night, seeing as it was clear and breezy, I left the cover off the genny to help it dry out.
This morning, when pulled over, it spluttered briefly into life and then died. Further fiddling made it start about one time in twenty. At this point, encouraged that the thing wasn’t entirely dead, and with assistance from my landlord Martin and his daughter Sabrina, I took the whole thing apart for further investigation.
This is slightly fiddly, but easy when you know how. Now that I do know how, I’m sharing that knowledge, as there seems virtually nothing on the internet about how to fix these generators, which gives an idea as to how reliable they are!

Anyway, first drain the fuel tank – this isn’t totally essential but is recommended on safety grounds. Next, remove the side maintenance cover and unscrew the grey plastic end covers (one around the sockets, one around the exhaust) – they both undo with four screws each and then pull off. To take the rest of the casing off, first peel back the rubber surround around the fuel cap on the side nearest the sockets – you’ll find a small brass circlip which you need to prize off. This is a bit of a fiddle, and even more so to get back on again unless you have circlip pliers.

circlip
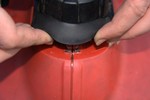
The circlip under the fuel filler surround

Now undo the screws on either side of the socket panel – there’s one on each side. They’re not captive, so remove them completely from the cover rather than dropping them on the ground when you tip the unit on its side! Roll the unit onto its side, with the starting handle downwards, and undo the screws in the handle and the base. You’ll need a Philips No 3 screwdriver (PH3) and if your unit is like mine, the screws will be very tight indeed. You should now be able to lift off the plastic cover and get at the insides in an ordered fashion. Alternatively (as I did), split the cover in half whilst the machine is upright, and watch everything spill all over the floor!

generator in bits
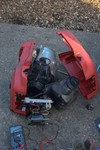
Anatomy of an EU10i – from back: engine/alternator block, fuel tank, inverter, socket panel

I was looking for the ignition system wiring, which is buried at the bottom of the casing underneath the engine and the inverter unit. This turns out to be a bit below Honda’s usual high standards – the ignition wiring has lots of connectors (some multipole and some bullet crimps) and none of them are very well waterproofed. What eventually solved my problem was getting at the engine switch, which is actually a small black microswitch just below the edge of the maintenance panel. It’s pressed in by the white plastic rod that’s turned by the engine switch knob itself. It’s a proper pain to get at, as you have to unscrew it from the cover from the inside, which involves moving everything else out of the way. Anyway, having unscrewed it, I was able to trace its cable back to a two-pole connector covered in muck and sludge, which I disconnected. Having done this and cleaned the connector, I pulled the starter carefully, and the engine sprang into life. Of course, it wouldn’t stop, as I’d disconnected the ignition switch (oddly, the switch closes to stop the engine) and so we had to stop it by pulling the HT lead off the spark plug.
I decided at this point to clean the water/oil/petrol/WD40/grime out of the casing and electrics, and to waterproof the ignition system connectors with self-amalgamating tape. Thanks to Helen for buying me some whilst she was in Cambridge!

switch
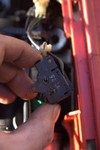
The engine microswitch

Reassembling the generator was a bit fiddly, too. Firstly, reassemble the engine mountings – the rubber disks and metal shafts – there are two in the bottom and one in the handle.

half-assembled generator
The generator with one side removed. Note the three round engine mountings

The inverter unit (the slim aluminium unit) and the fuel tank have to fit together quite tightly, and there’s a rubber spacer that holds them in the right position:

inverter and fuel tank
The inverter (top) and fuel tank (bottom) with the rubber spacer between them
Reassembling the case is fairly easy as long as you have the inverter and fuel tank located correctly in their mountings. You may need a second pair of hands (thanks Sabrina!) to hold the casing together whilst you get the circlip back on.

Anyway, I now have a working generator, and am going to take more detailed steps to stop it getting wet in future – but I hope my experience will help anyone else who suffers similar problems.


Matlab progress

February 16th, 2008

Shortly after writing that last ranty blog post, the MathWorks salesman emailed me back saying that he could grant me temporary access to the software whilst the sale went through. It would have been helpful to know this six weeks ago! Anyway, I’m now able to get going on some RF simulation work, for which I’m profoundly grateful…


The MathWorks, Inc are a Bad Railway

February 11th, 2008

You may have come across MATLAB, the matrix-manipulating maths package that’s widely used by engineering academics. It’s published by an American firm called The MathWorks, whose slogan is “Accelerating the pace of engineering and science”. This appears to be, in the immortal words of Douglas Adams, a load of dingo’s kidneys. I’ve been trying to buy a copy of their software (MATLAB, Simulink and the various Communications add-ons for them) since before Christmas, and they’ve now wasted over a month of my time in failing to supply it.

The complicating factor is that MATLAB is extraordinarily expensive. The list price for my combination of options, as a single-user licence (that is, a licence for just me to use it on my computer) is over £6000! However, MathWorks have always given huge discounts to universities, which is why it’s so widely used in academia. BAS have been negotiating with MathWorks for about a year to get the academic price on the software (which would seem reasonable given that we’re a government-funded academic research institution) and just before Christmas I was told that the team had negotiated for a significant discount. I promptly raised a purchase order before the Christmas holidays set in, then came back to find nothing had happened. I’ve spent all of January chasing Steve (the purchasing officer) who has in turn been chasing MathWorks by phone and email and even refaxed the purchase order to them, and still no answer. Today I return to work after being on holiday for a week (Skiing in the French Alps, marvellous!) and find that a) nothing has happened and b) Steve is on holiday. I get a copy of the correspondence from one of Steve’s colleagues and chase the firm myself. Their salesman and I play voicemail tennis this morning and I eventually get a message from him saying that we need an invoice number to qualify for the discount. I go and see David, the Head of Engineering, who’s been doing the negotiating. He calls the salesman, who promises to email us more details of what hoops we need to jump through.
The saga continues.

In the mean time, I would like to say that The MathWorks, Inc, are a Bad Railway. If anyone else is planning on buying their products, I would seriously reconsider it!


Generator woes

January 28th, 2008

I went to Dublin a couple of weeks ago with work, to be enthusiastic about BAS to Irish schoolchildren at a big exhibition, and whilst I was away it rained a lot in Cambridge. Upon my return, I pulled the starting handle on my ever-faithful Honda generator and it wouldn’t start. Oh dear. One of the features of Honda engines is that they are extremely reliable, and the little EU10i generator has performed brilliantly for as long as I’ve owned it. It nearly always starts on one pull and is quite happy to look after itself – the nifty electronic engine management stops it automatically if it overheats, runs out of oil, etc, etc, and so it’s virtually foolproof. I put two and two together and reckoned that the wet weather was possibly to blame. The generator does normally live on deck (it’s unwise to keep petrol in a closed cabin near to sources of ignition, and against the Boat Safety Regulations) and it did once have a rather nice Honda waterproof cover until it blew away in some very high winds a month or two ago.

I brought the generator inside to try and dry it off, but still nothing. So I eventually took it down to the Honda agents, Elliotts, in Bar Hill, just outside Cambridge, where they serviced it and solved the problem, which turned out to be water in the fuel tank and carburettor. This cost me £60, but they did do a service (oil and filter change, new spark plug) at the same time, which I’d been meaning to do anyway. To avoid further expense in future, I shall be keeping a strong plastic bag strapped over it whilst it’s living outside!

The fact that the internet contains virtually no information about possible faults with an EU10i shows how reliable they are – so I’m blogging this in the hope that anyone else who has a wet generator that won’t start knows to either take the machine to be fixed or cleans and dries the carburettor and fuel tank themselves!


Adrift

January 7th, 2008

This morning it was very windy. According to the Met Office, the wind was 30mph with 50mph gusts, which made for an entertaining bike ride into work!

Just as I was getting a coffee, I got a phonecall from my neighbour Helen, to say that Innocenti was in danger of coming adrift, but that they were getting things under control. What had happened was that the force of the wind (which was coming across the fen and hitting the boat broadside on) had ripped out the two mooring stakes and the boat was only being held to the bank by the stern rope, which was tied around a solid metal post set in concrete. When Helen, Gabriel and Phil started to rescue the boat, this post and concrete block were being dragged away from the bank by the combined force of the wind and current.

I got a text later on saying it was secure, but reckoning that they’d lost the gangplank. This was a pain, as I’d actually borrowed the gangplank from Phil (he’s got a spare one) after the last one vanished downriver when the boat last came adrift. I decided to shorten my afternoon at work and go and check on things – when I got back to Waterbeach I found all the boats tied up very securely and I put a couple of extra mooring lines on Innocenti just to make sure. Phil, meanwhile, had found the gangplank on the other side of the river (it floats, being wooden) and retrieved it, so I was saved the cost of a new one for him! I’ve subsequently bought a long piece of wood to make a new one, but it’ll have to be painted before I can leave it outside. Another job to add to the queue…


In-boat entertainment

January 6th, 2008

Once again I begin by apologising for not writing earlier – just when I’d settled back into life on the boat I became embroiled in the whirlwind of Christmas and have only just extricated myself again… happy New Year everyone! It’s odd to think that I was still at Fossil Bluff this time last year – 2007 was a pretty excellent year for me, so let’s hope 2008 is as good or better.

Anyway, a slightly geeky post this one, but perhaps one of interest to my fellow boaters. I’ve just this evening finished wiring my new stereo system in the cabin, which includes the rather nice new loudspeakers that Mum and Dad kindly gave me for Christmas. I’ve also been meaning to describe the work I did installing a DAB radio in the kitchen back in September, so instead I’ll describe them both here.

Starting with the radio, I quickly realised once I was living alone on the boat that I needed Radio 4 to keep me company. My little FM portable doesn’t work at all inside the boat, of course, so I had to look at getting a radio with an external antenna. The obvious solution is a car radio, of course, but I went and looked at a few and found them to expensive, ugly and with rather poor user interfaces. Anyway, I dawdled around the various electrical megastores in Newmarket Road and came across this Hitachi DAB radio in Currys. It’s a DAB/FM radio, which uses the NXT flat-panel loudspeakers, making the design very slim and light. However, the two clinching factors were that it runs on 12v from an external power supply (meaning that I could easily hook it into the boat’s electrics) and that the telescoping antenna supplied with it can be easily replaced by an external one. A quick trip to Maplin supplied me with a suitable power connector and cable, which got wired into the kitchen lighting circuit, and then I found a suitable DAB antenna kit in the Screwfix catalogue. The antenna is clamped onto the handrails up at the bows, and the feeder cable runs along the handrail and then comes down to the radio through the ventilator in the kitchen ceiling. It works well, although it suffers from the problem of all DAB sets – it uses a lot of power.

For the main cabin I wanted a system to play music from my little MP3 player, and found the intriguing Sonic Impact T-Amp whilst Googling for 12v amplifiers. The T-Amp is tiny, not much bigger than a paperback book, and all that’s in it is a little one-chip amplifier and a volume control. It uses a clever PWM-based circuit that lead some people to call it a “digital amplifier”, which it isn’t, it’s more like a switch-mode power supply. Anyway, some reviews on the internet suggested that various people in the audiophile community reckon that this is The Best Thing Since Sliced Bread, and at about £30 it seemed like a good buy. Then I actually tried to buy one. The things seemed to be in very short supply, so I ended up ordering one from Think Geek in the US because it was about the same price including shipping as the only UK stockist, and Think Geek had one in stock. I’m glad I did because the manufacturers have subsequently discontinued the basic model and replaced it with a more expensive second-generation model, which is basically the same circuit in a fancier case. Anyway, it’s sat around in its box waiting for a pair of loudspeakers since November. Today I’ve hooked it up to the pair of JBL Control One speakers that I got for Christmas (thanks again, Mum and Dad!) and also managed to wire it into the boat’s 12v supply. This was only slightly trickier than it sounds. One of the reviews I read said that the amp runs from a nominal 12V but won’t tolerate any more than 14V. Unfortunately, the boat’s alternator regulator routinely kicks out 14.5V with the engine running (this improves the battery charging performance), so I needed a regulator to protect the amp. Fortunately I found one in Maplin today – it’s a little compact multi-voltage unit which comes with a choice of DC plugs, one of which fits the T-amp – and it delivers the necessary 1.5A to the amplifier quite happily. I wired in an extra cigar lighter socket at the forward end of the cabin and plugged it all in – hey presto, music! The system does sound good, although it’s hard to tell given that the source is my tiny MP3 player with its compressed music and the boat cabin’s hardly an ideal listening room. Anyway, I now have to decide how best to mount the loudspeakers, as they’re currently just floating around the floor until I give them a proper home.


The water works!

November 28th, 2007

Just a quick update – this morning I’ve filled the water tank and after a little faffing to remove an airlock in the pump inlet hose, we now have water in the taps at a sensible rate of flow. And the hot water system now works properly and doesn’t give up when you try and mix hot and cold water. Now all I have to do is get some heavy-duty silicone sealant to stick the access hatch back down on the water tank so that it doesn’t get leaves and dirt blown into it.